BlackBerry Parts and Accessories Store
Contact form


BlackBerry DTEK50 Disassembly Instructions

We'll assist you to disassemble the BlackBerry DTEK50 smartphone — just follow these instructions. We'll not ask why you decided to take the device apart by yourself, however:

Please note, you take full responsibility for the process and for the results. BlackBerry DTEK50 is very difficult to disassemble even with these instructions. We recommend you come to professional service center, if you are not deeply sure.

Tools for BlackBerry DTEK50 teardown

To disassemble the BlackBerry DTEK50, you will need these tools:

  • Screwdriver of type ⊕
  • Plastic tools for detaching parts
  • A knife with a thin blade
  • Dryer

Buy tools for disassembly.

Spare parts for BlackBerry DTEK50 repair

All parts for repair of BlackBerry DTEK50 you can buy at the corresponding page of the website.

Original battery TLp026E2 for BlackBerry DTEK50 Chip antennas for BlackBerry DTEK50 Motherboard for BlackBerry DTEK50 SIM-card holder and card for BlackBerry DTEK50, Metallic LCD screen assembly with touch-screen and bezel for BlackBerry DTEK50, Carbon Grey

Information on the device:

Shop for Smartphone BlackBerry DTEK50

The most secure Android smartphone in the world

You will not give your money to an insecure bank, nor will you leave the house open when you go on leave. You are similar to your information, choosing BlackBerry. DTEK — accumulated experience of security and privacy technologies, that's why the smartphone got the name DTEK50. Modern and productive, with Android 6.0 Marshmallow installed and BBM and Hub applications, a huge screen, this smartphone is both a working tool and a platform for entertainment.

Shop for Smartphone BlackBerry DTEK50:

BlackBerry DTEK50 disassembly instructions
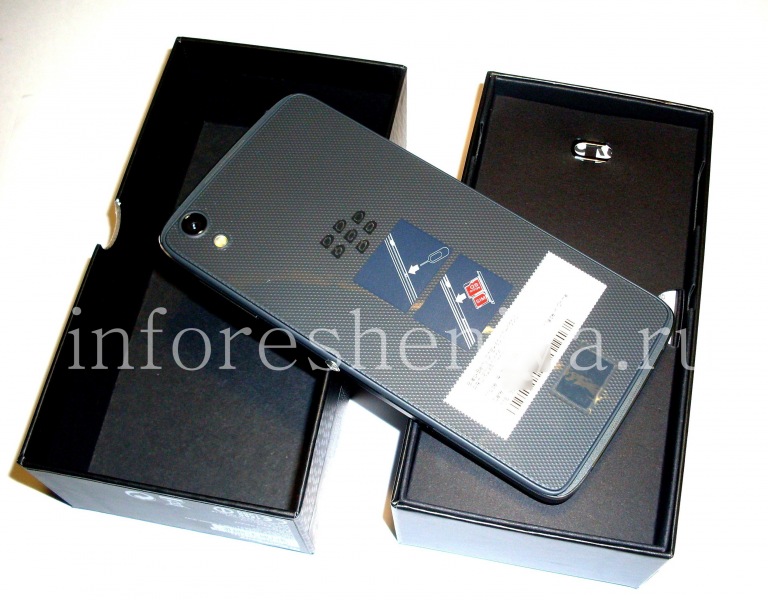
BlackBerry DTEK50 Disassembly and Teardown: Well, here is brand new BlackBerry DTEK50 for teardown.
Well, here is brand new BlackBerry DTEK50 for teardown.
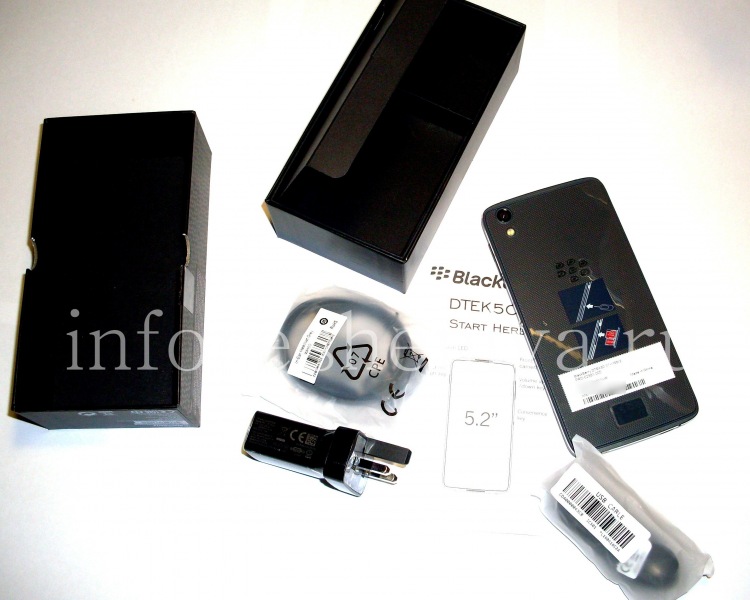
BlackBerry DTEK50 Disassembly and Teardown: Aside the smartphone itself, there are some other stuff in the box: stereo headset, USB-cable, wall charger, needle for sim-slot and memory card opening, and instructions. We'll need only needle for disassembly ;)
Aside the smartphone itself, there are some other stuff in the box: stereo headset, USB-cable, wall charger, needle for sim-slot and memory card opening, and instructions. We'll need only needle for disassembly ;)
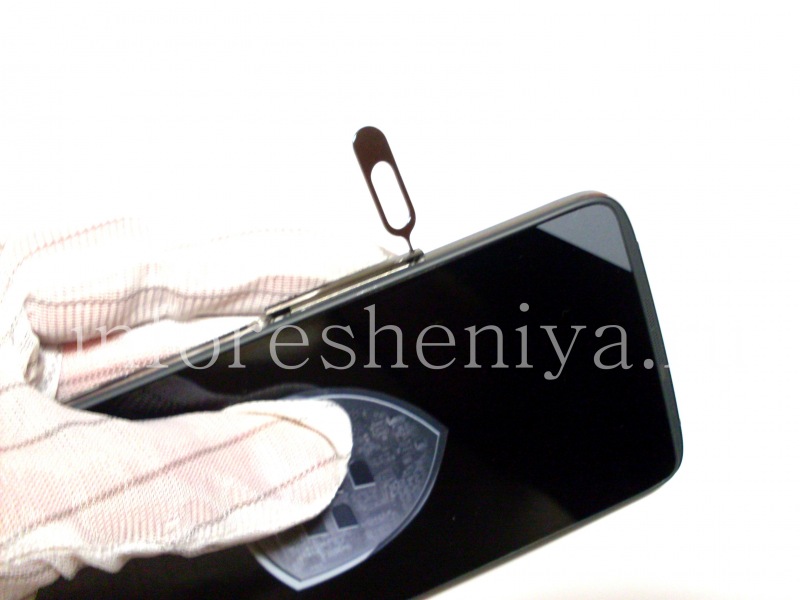
BlackBerry DTEK50 Disassembly and Teardown: Ok, use the needle for sim-slot and memory card opening.
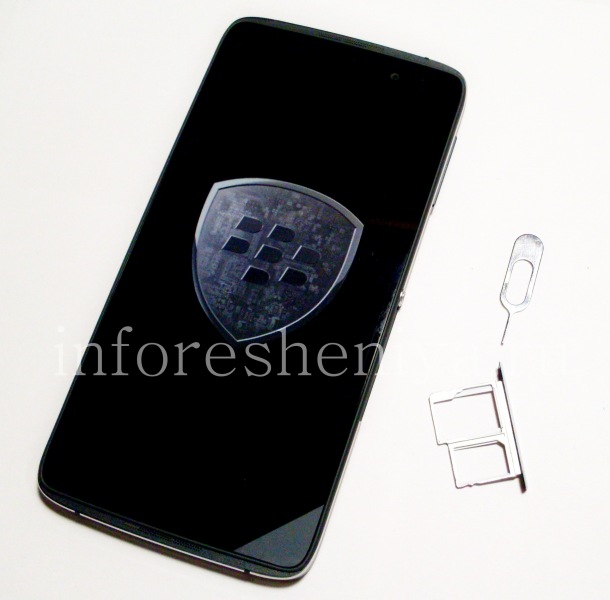
Ok, use the needle for sim-slot and memory card opening.
BlackBerry DTEK50 Disassembly and Teardown: The only easy part of BlackBerry DTEK50 take apart is completed.
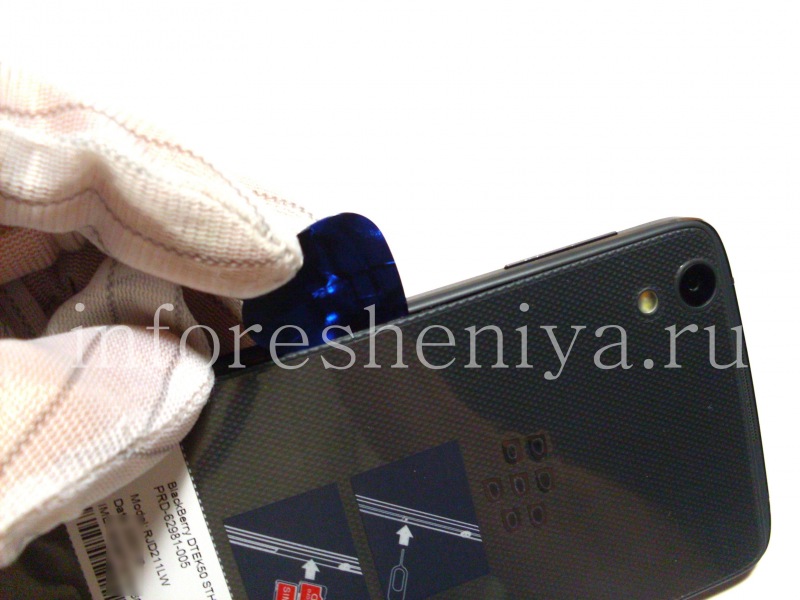
The only easy part of BlackBerry DTEK50 take apart is completed.
BlackBerry DTEK50 Disassembly and Teardown: Removing the back cover. Before you start, use dryer to heat smartphone (do not overdo it) — so the glue adhesion would alleviate. Take the plastic opener and put it under the battery cover somewhere near the middle of the device bezel.
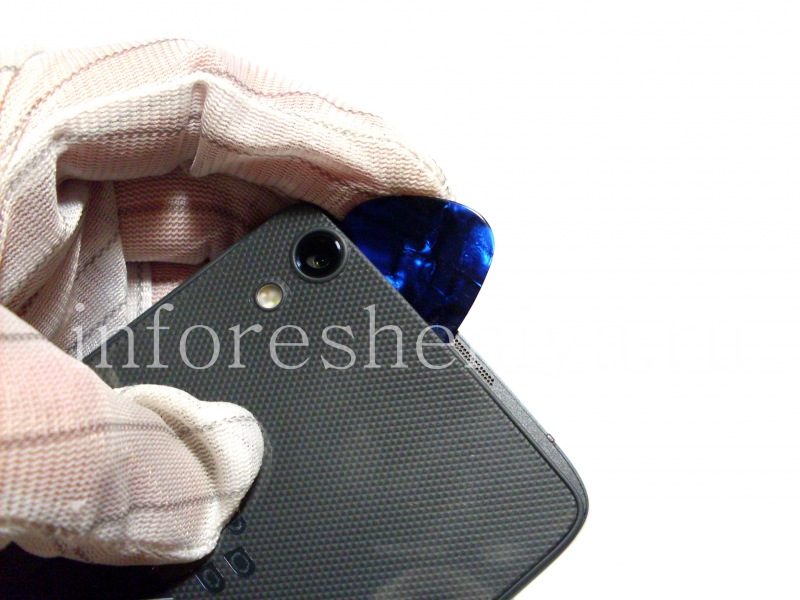
Removing the back cover. Before you start, use dryer to heat smartphone (do not overdo it) — so the glue adhesion would alleviate. Take the plastic opener and put it under the battery cover somewhere near the middle of the device bezel.
BlackBerry DTEK50 Disassembly and Teardown: Separate the back cover around the DTEK device.
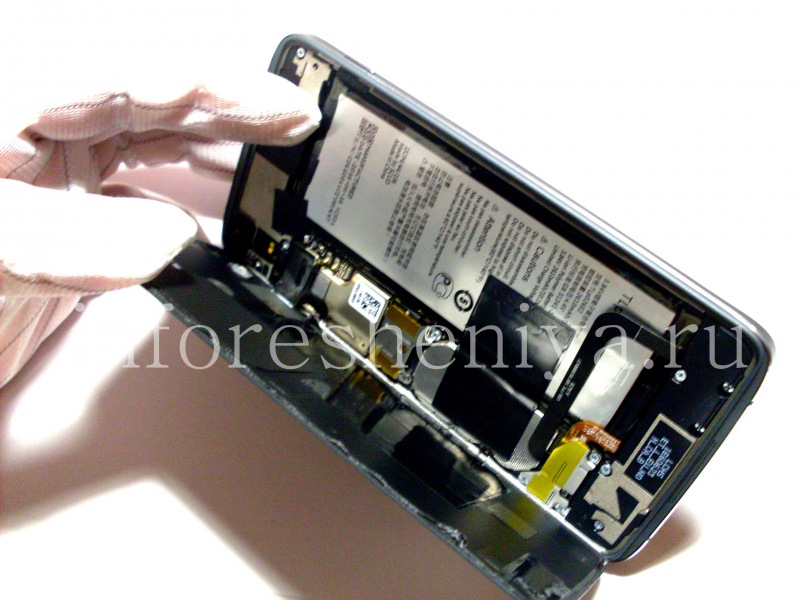
Separate the back cover around the DTEK device.
BlackBerry DTEK50 Disassembly and Teardown: Slowly, starting with the side part of smartphone, remove the cover.
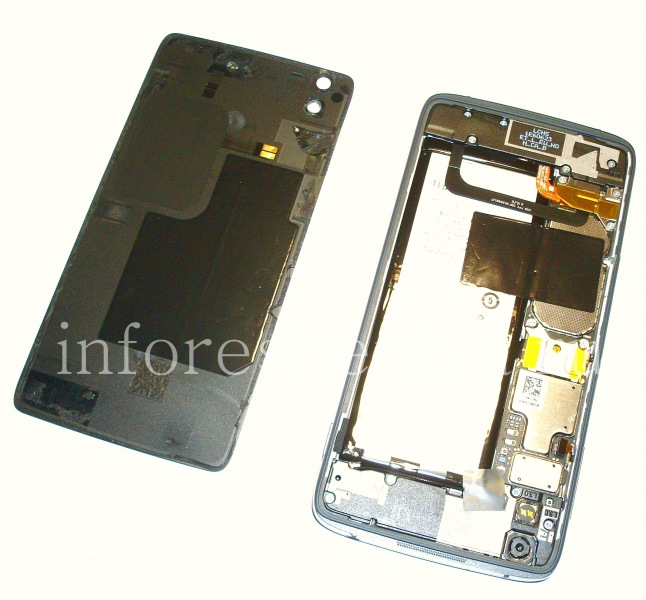
Slowly, starting with the side part of smartphone, remove the cover.
BlackBerry DTEK50 Disassembly and Teardown: We are ready. Continue?
We are ready. Continue?
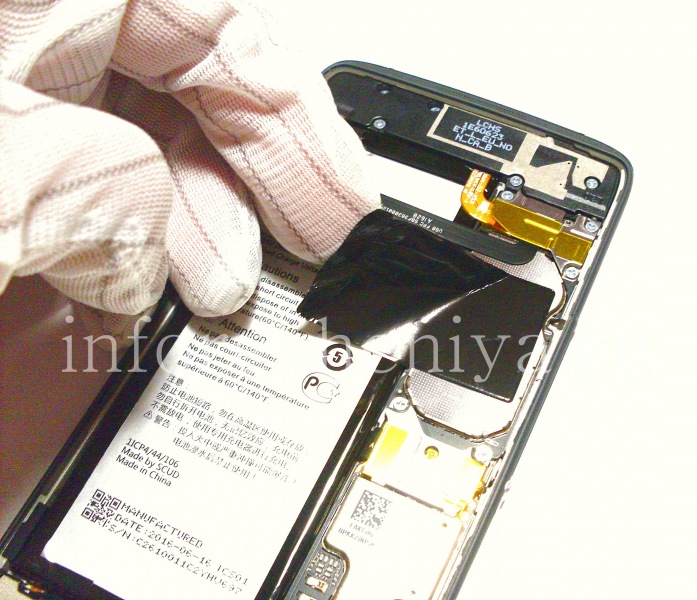
BlackBerry DTEK50 Disassembly and Teardown: Remove the protective film from the battery.
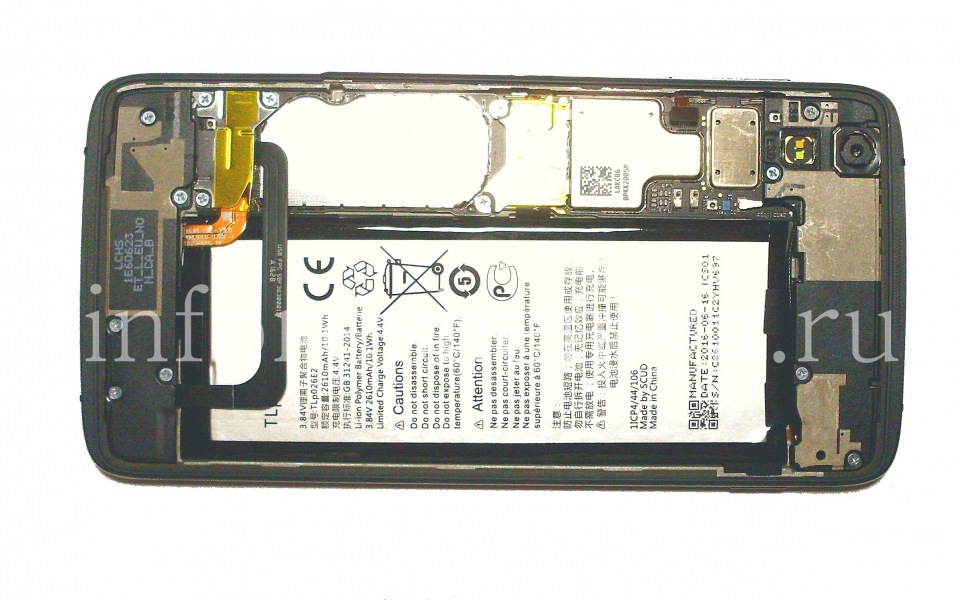
Remove the protective film from the battery.
BlackBerry DTEK50 Disassembly and Teardown: That's what we have: body of BlackBerry DTEK50, which includes the upper and lower speaker panels, the battery, and the motherboard.
That's what we have: body of BlackBerry DTEK50, which includes the upper and lower speaker panels, the battery, and the motherboard.
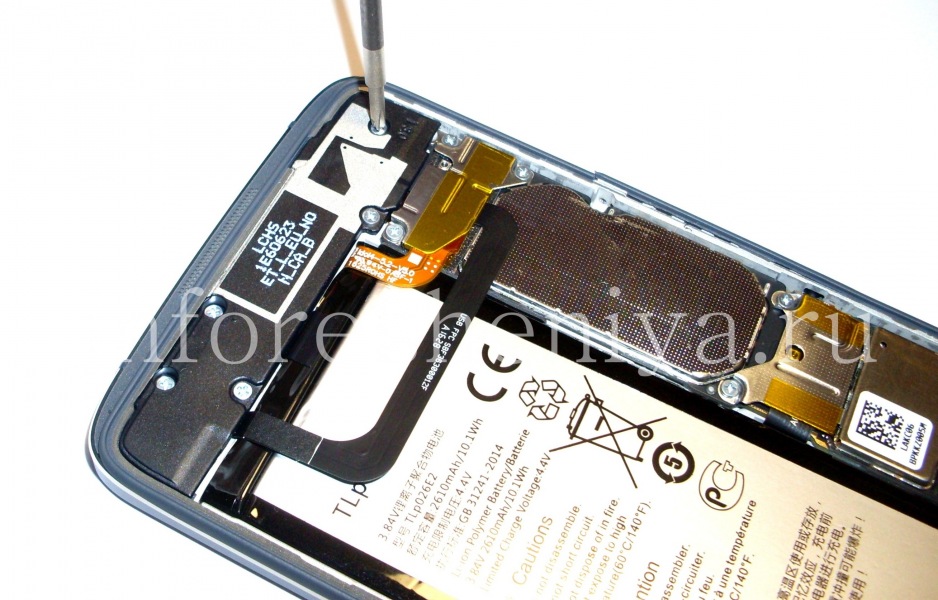
BlackBerry DTEK50 Disassembly and Teardown: Now'are removing the part called Bottom panel with media speaker and antenna for BlackBerry DTEK50: it fastens with five screws of type ⊕, unscrew them.
Spoiler: most attentive readers are noticed already the inscription "Idol4" on the battery connector.
Now'are removing the part called Bottom panel with media speaker and antenna for BlackBerry DTEK50: it fastens with five screws of type ⊕, unscrew them.
Spoiler: most attentive readers are noticed already the inscription "Idol4" on the battery connector.
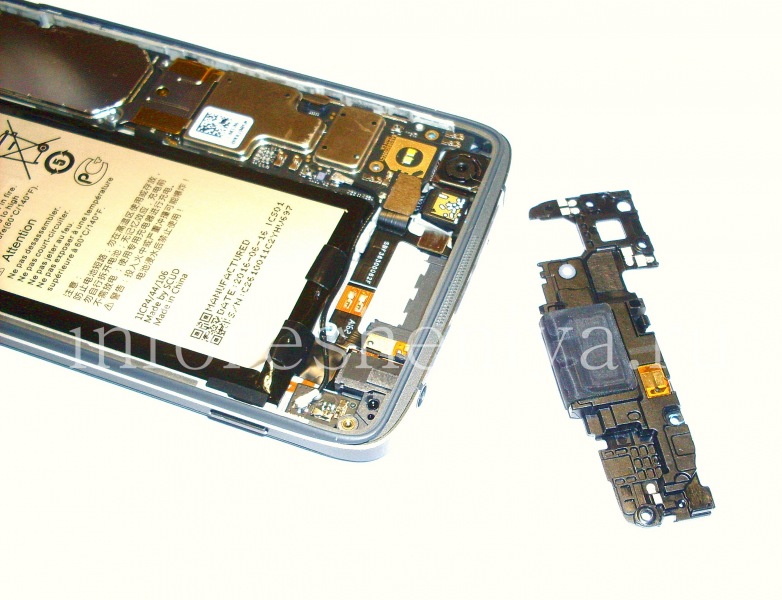
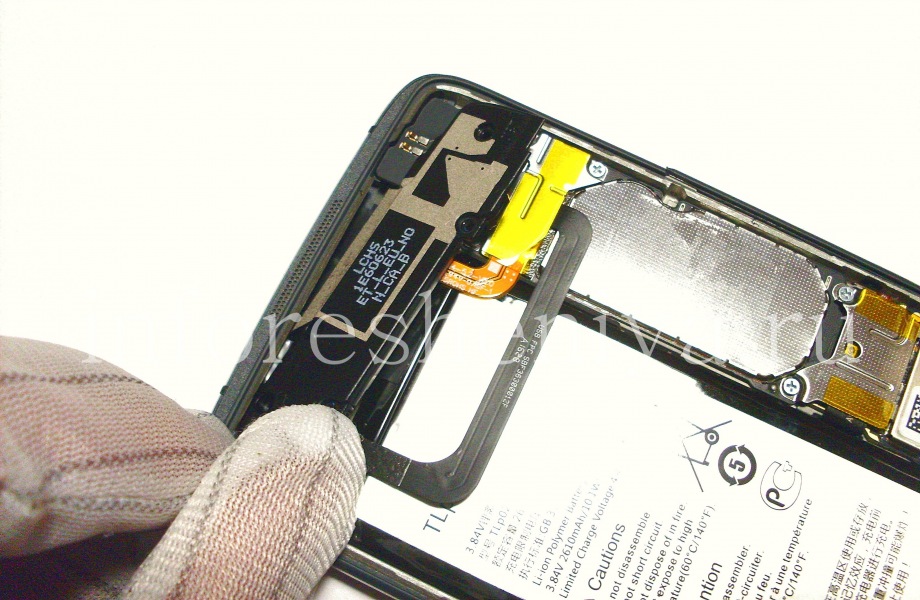
BlackBerry DTEK50 Disassembly and Teardown: Now we can remove the bottom speaker panel.
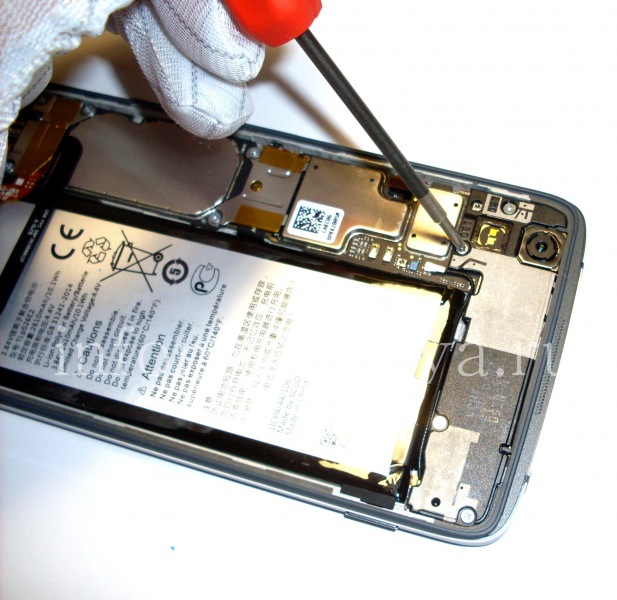
Now we can remove the bottom speaker panel.
BlackBerry DTEK50 Disassembly and Teardown: Go to the Top panel with the voice speaker and antenna. Similarly, only the are not 5 screws, but 4.
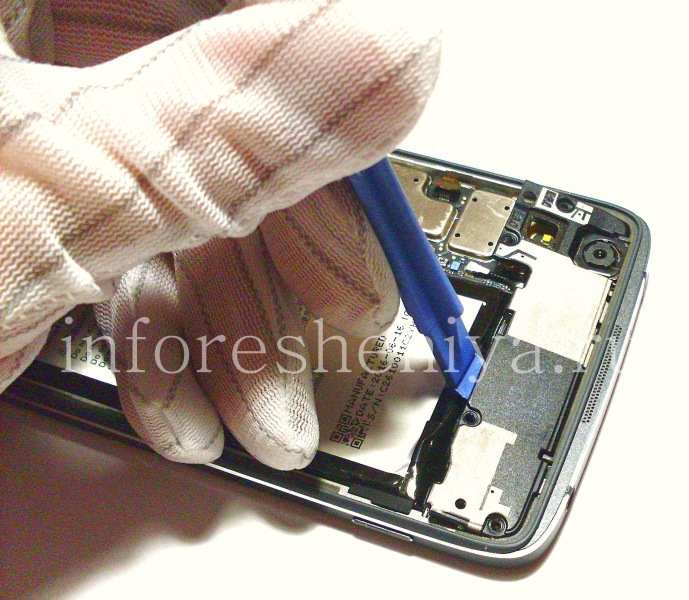
Go to the Top panel with the voice speaker and antenna. Similarly, only the are not 5 screws, but 4.
BlackBerry DTEK50 Disassembly and Teardown: Carefully take this part off.
Carefully take this part off.
BlackBerry DTEK50 Disassembly and Teardown: Under the panel we see PCB of audio connector assembly with LED-indicator, proximity sensor and ambient light, flash, microphone and power button.
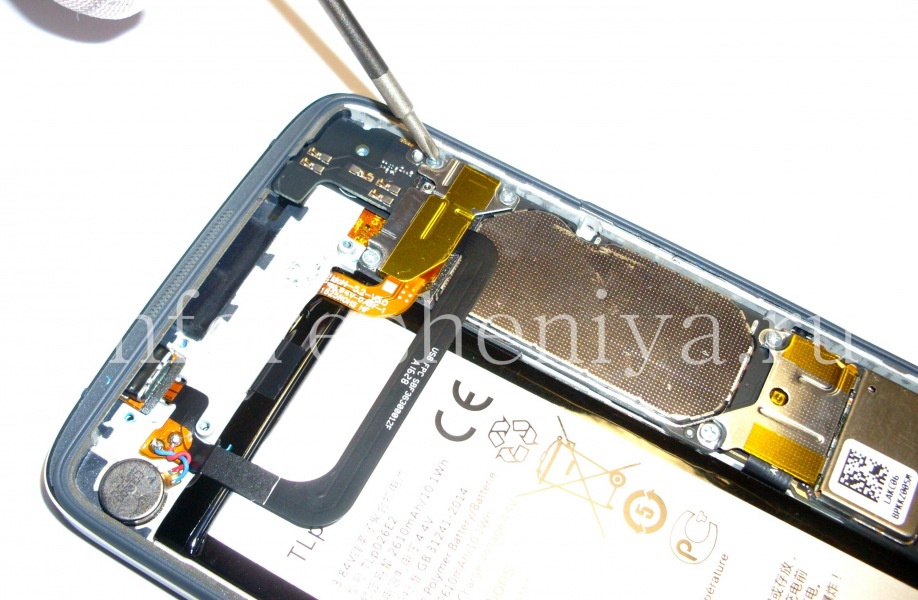
Under the panel we see PCB of audio connector assembly with LED-indicator, proximity sensor and ambient light, flash, microphone and power button.
BlackBerry DTEK50 Disassembly and Teardown: To detach the connectors of components from the motherboard, you must remove the protective covers first. Lower attached by three ⊕ type screws.
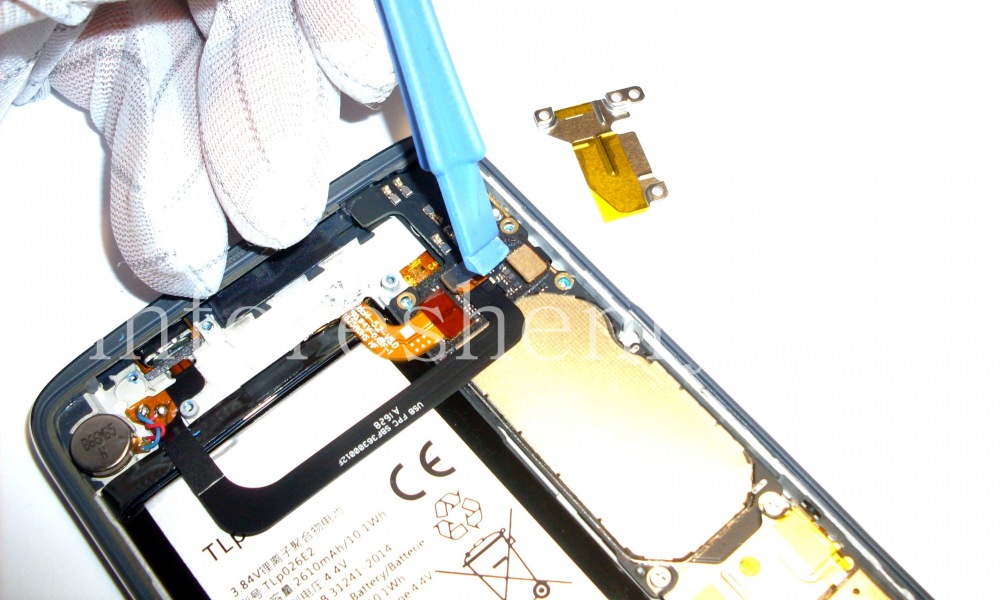
To detach the connectors of components from the motherboard, you must remove the protective covers first. Lower attached by three ⊕ type screws.
BlackBerry DTEK50 Disassembly and Teardown: Under this holder disconnect 3 connectors with a plastic instrument: USB-connector loop, battery and touch-screen (on this photo).
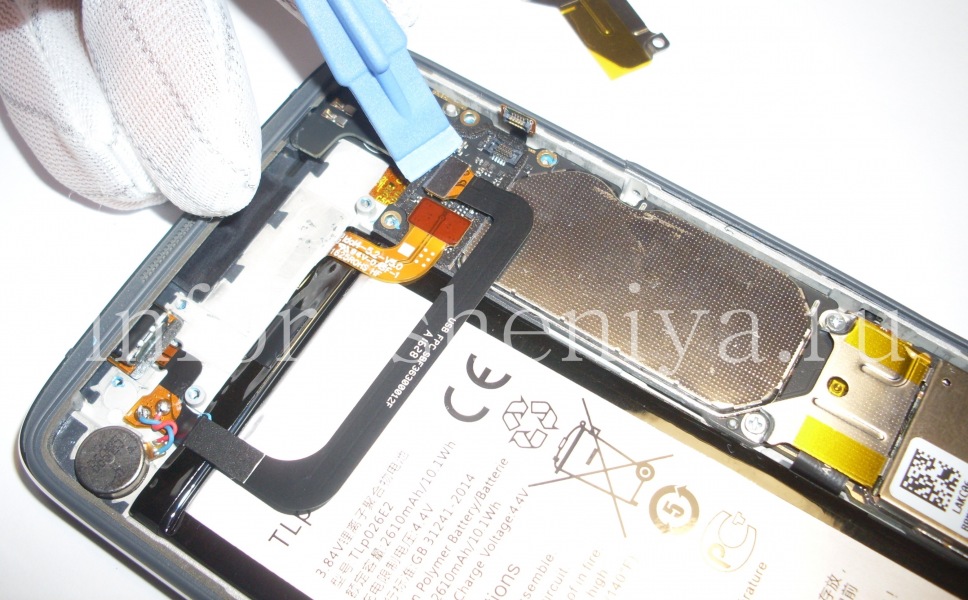
Under this holder disconnect 3 connectors with a plastic instrument: USB-connector loop, battery and touch-screen (on this photo).
BlackBerry DTEK50 Disassembly and Teardown: Unplug the USB-connector of T17 type (on the loop)..
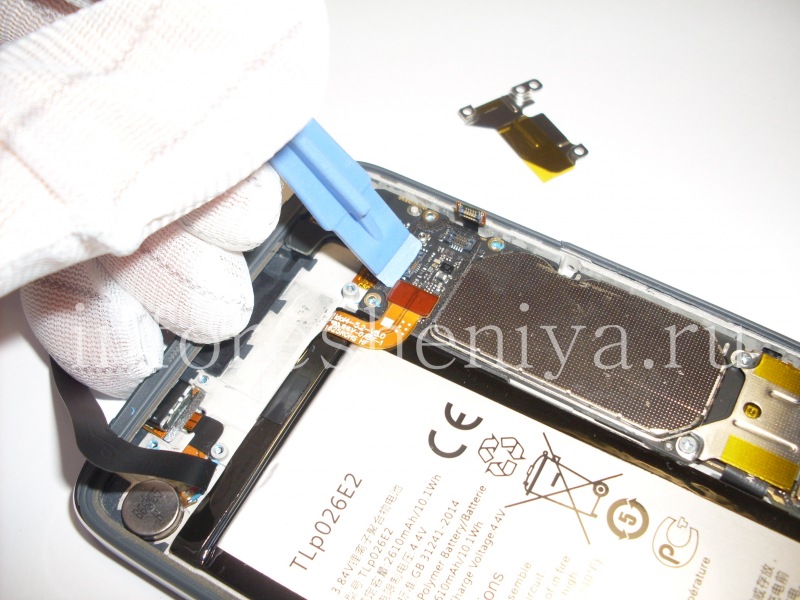
Unplug the USB-connector of T17 type (on the loop)..
BlackBerry DTEK50 Disassembly and Teardown: ..and the battery connector.
..and the battery connector.
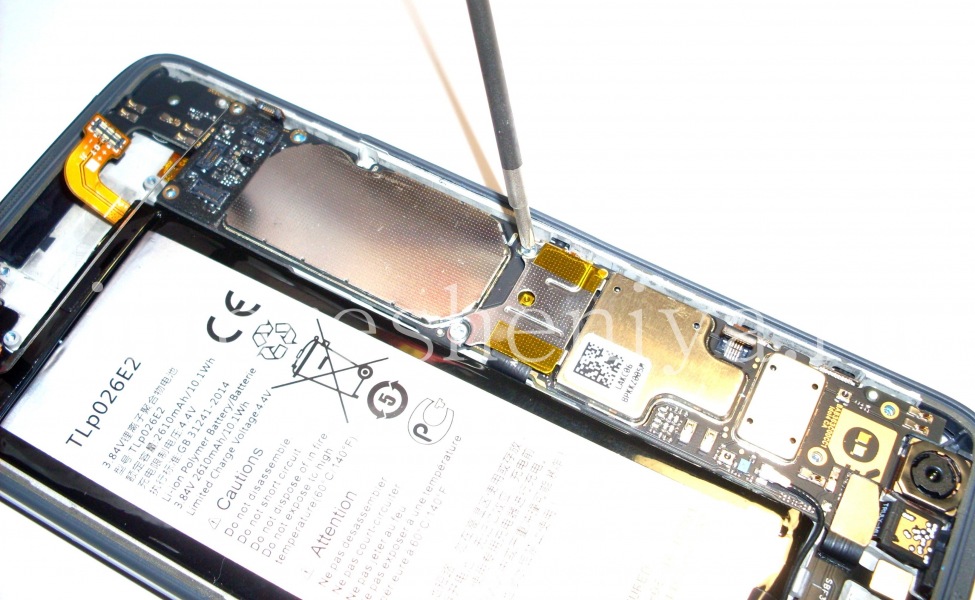
BlackBerry DTEK50 Disassembly and Teardown: Remove the top cover bracket: two screws of type ⊕.
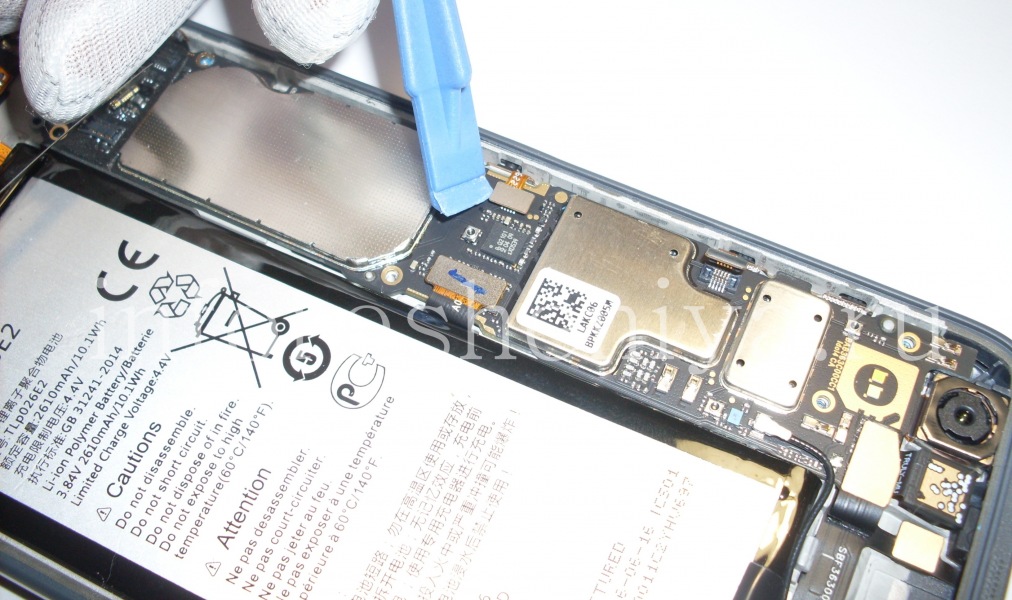
Remove the top cover bracket: two screws of type ⊕.
BlackBerry DTEK50 Disassembly and Teardown: First loosen the connector pins of the convenience button..
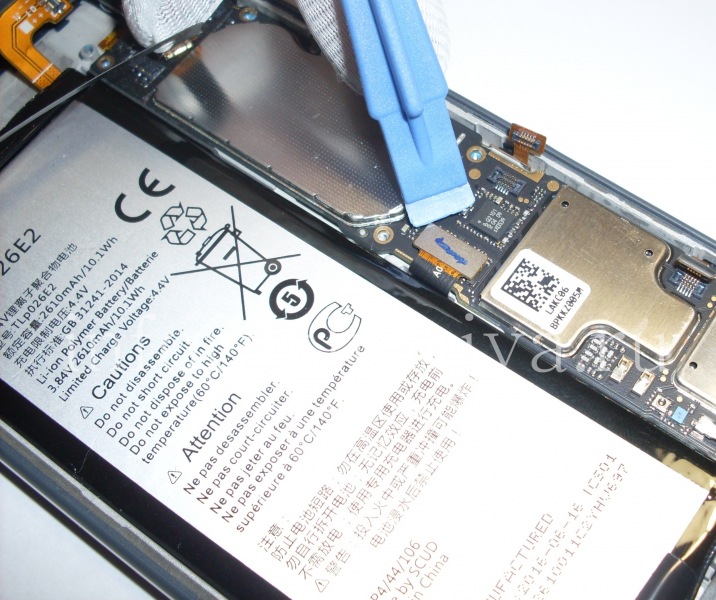
First loosen the connector pins of the convenience button..
BlackBerry DTEK50 Disassembly and Teardown: ..and second is LCD screen connector.
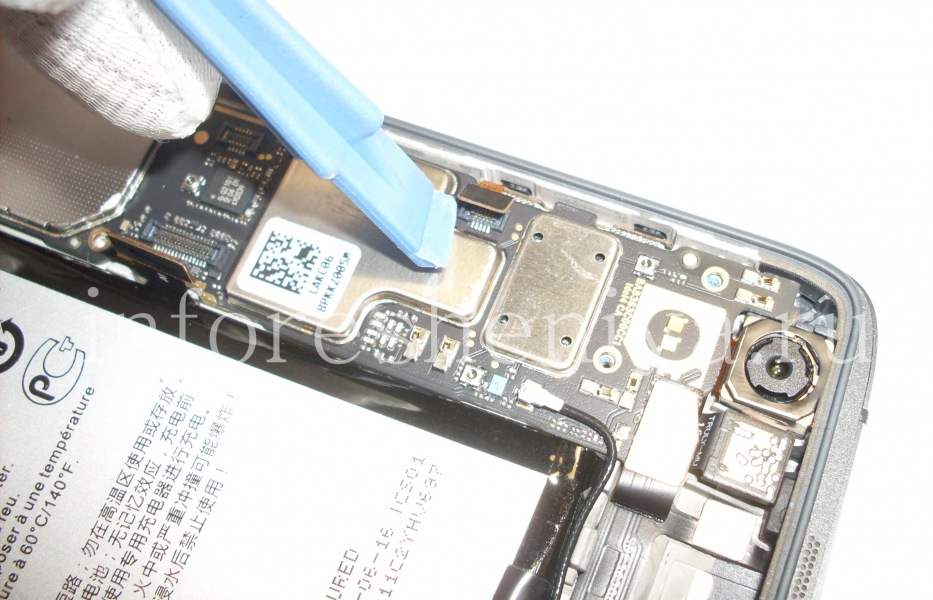
..and second is LCD screen connector.
BlackBerry DTEK50 Disassembly and Teardown: Slightly above unclip the connector of volume control buttons.
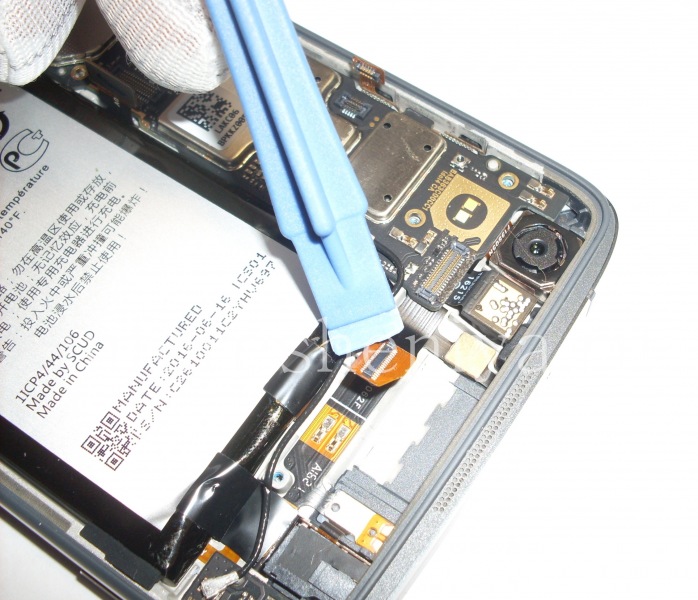
Slightly above unclip the connector of volume control buttons.
BlackBerry DTEK50 Disassembly and Teardown: And then using the same plastic pry tool unclip connector of PCB of audiojack assembly with LED-indicator, proximity sensor and ambient light, flash, microphone and power button.
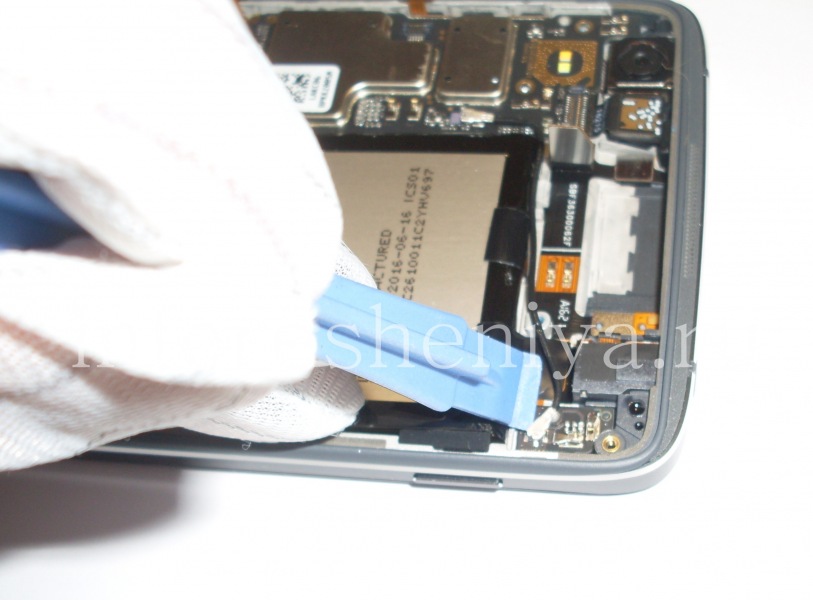
And then using the same plastic pry tool unclip connector of PCB of audiojack assembly with LED-indicator, proximity sensor and ambient light, flash, microphone and power button.
BlackBerry DTEK50 Disassembly and Teardown: The same action for the connecting cable from the antenna chip..
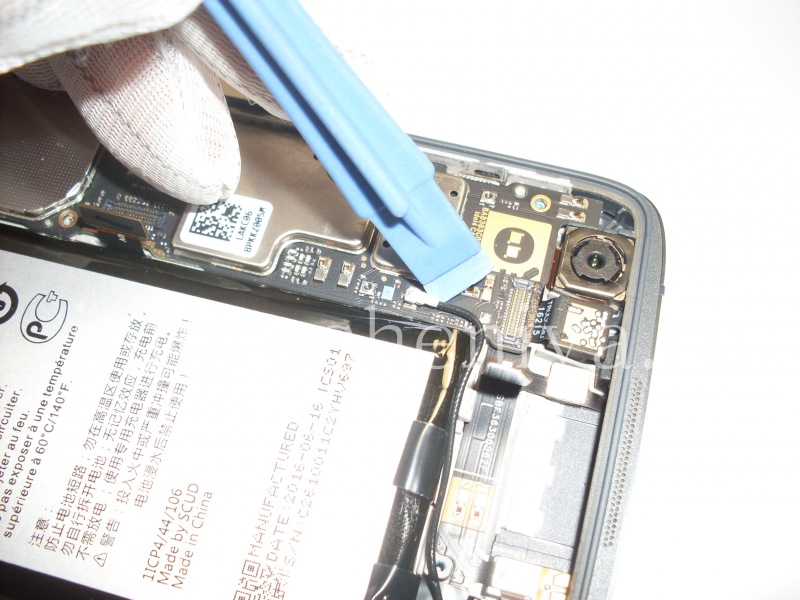
The same action for the connecting cable from the antenna chip..
BlackBerry DTEK50 Disassembly and Teardown: ..and from the motherboard.
..and from the motherboard.
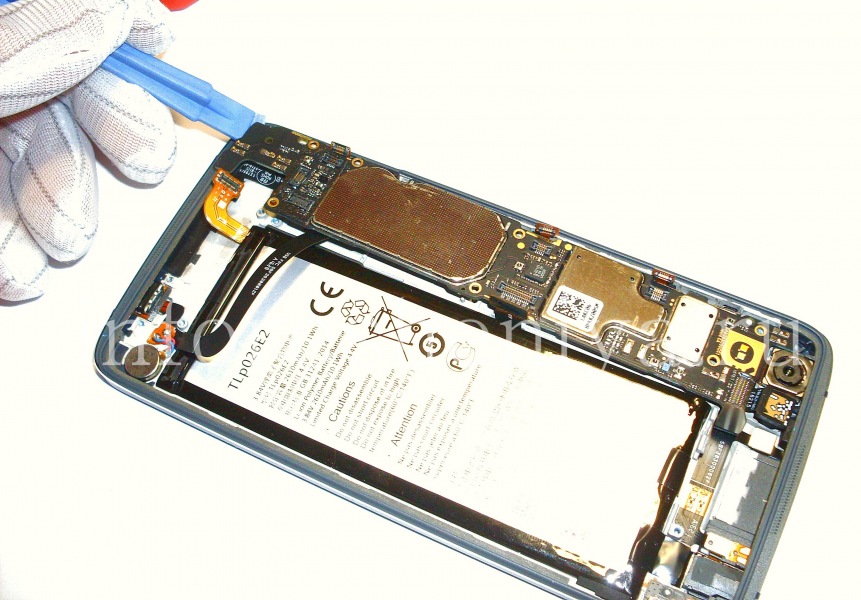
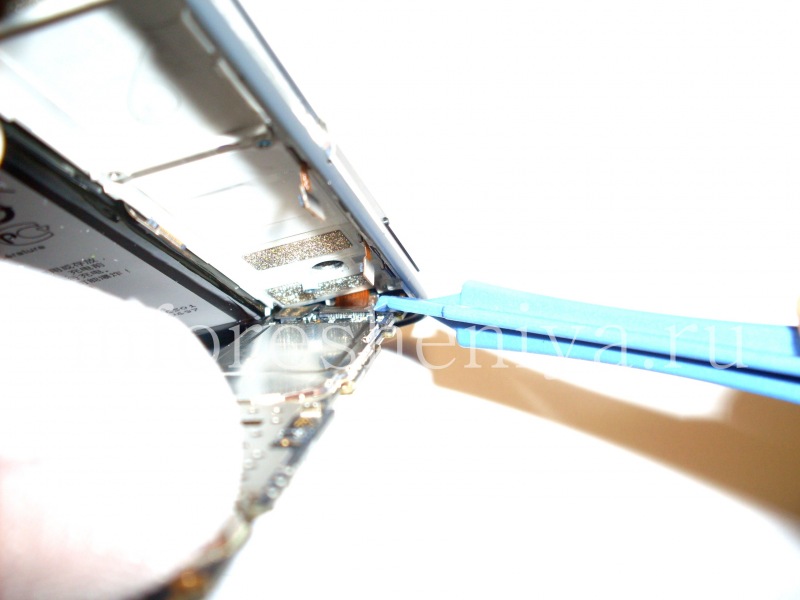
BlackBerry DTEK50 Disassembly and Teardown: Now you can remove the BlackBerry DTEK50 motherboard. I recommend to start from the bottom with a plastic tool.
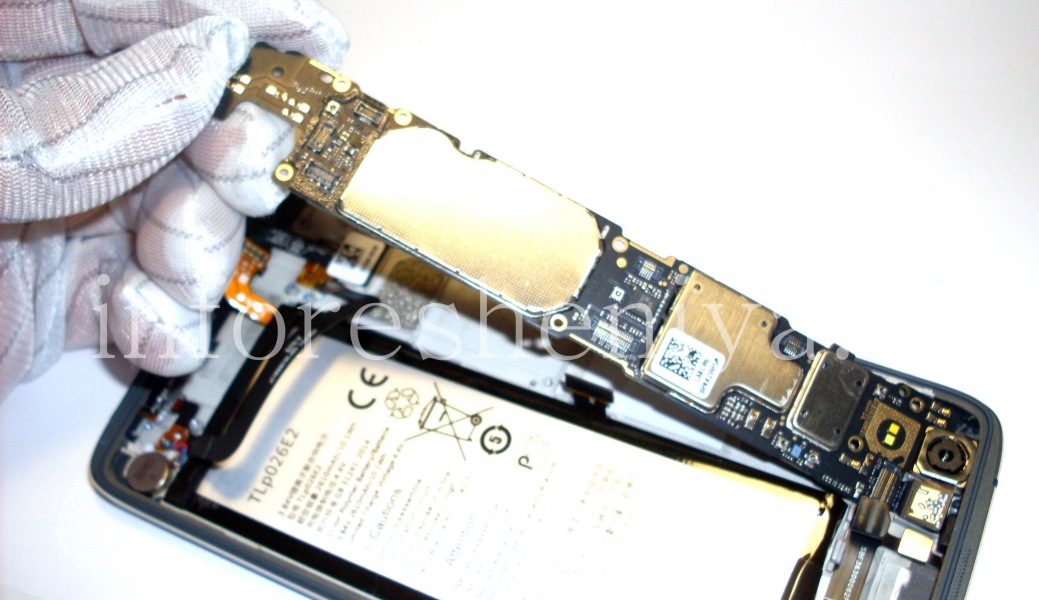
Now you can remove the BlackBerry DTEK50 motherboard. I recommend to start from the bottom with a plastic tool.
BlackBerry DTEK50 Disassembly and Teardown: You can then pick up it by hand.
You can then pick up it by hand.
BlackBerry DTEK50 Disassembly and Teardown: Be careful, you may need to remove the connector of rear camera on the top of the motherboard.
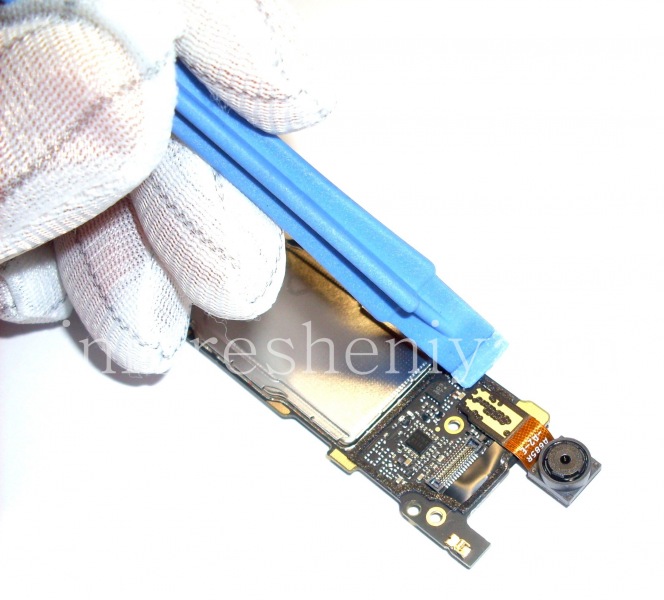
Be careful, you may need to remove the connector of rear camera on the top of the motherboard.
BlackBerry DTEK50 Disassembly and Teardown: Here we go to the motherboard — there is a front-facing camera (T27 type for BlackBerry DTEK50).
Here we go to the motherboard — there is a front-facing camera (T27 type for BlackBerry DTEK50).
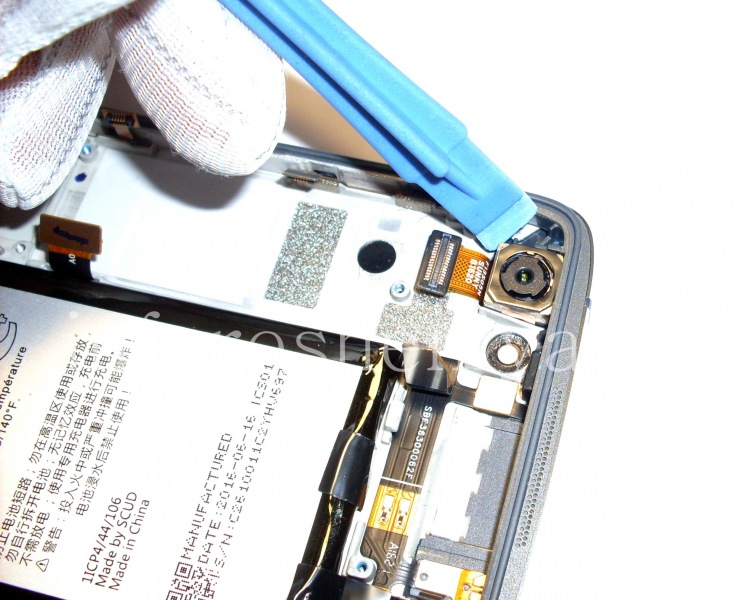
BlackBerry DTEK50 Disassembly and Teardown: Main camera is of type T26, release it from the middle part of the housing.
Main camera is of type T26, release it from the middle part of the housing.
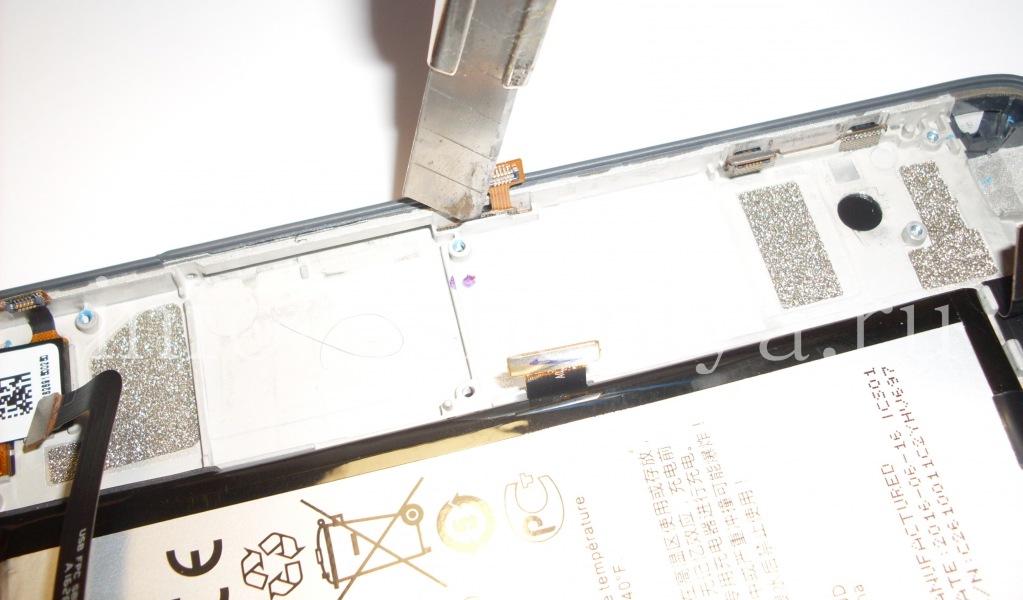
BlackBerry DTEK50 Disassembly and Teardown: Continue. Separate the contact PCB of convenience button by knife and remove it from the bezel.
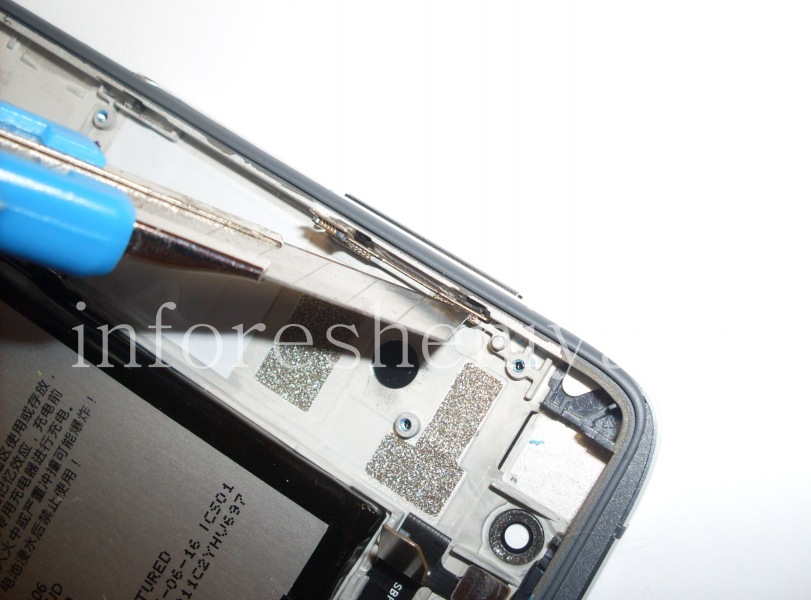
Continue. Separate the contact PCB of convenience button by knife and remove it from the bezel.
BlackBerry DTEK50 Disassembly and Teardown: Similarly is for contacts of volume control buttons.
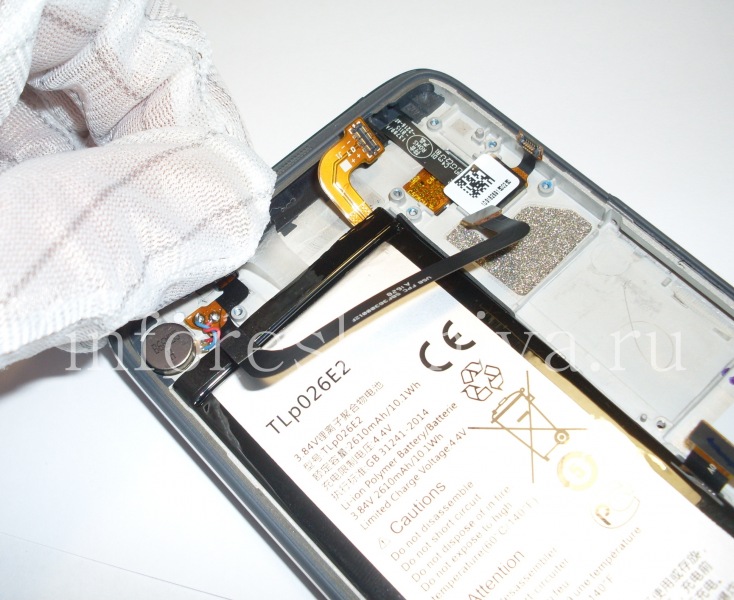
Similarly is for contacts of volume control buttons.
BlackBerry DTEK50 Disassembly and Teardown: To remove the battery, pull the black bars from the top (2 pieces) and the bottom (1 pc), as pictured. Following you pull the glue under the battery.
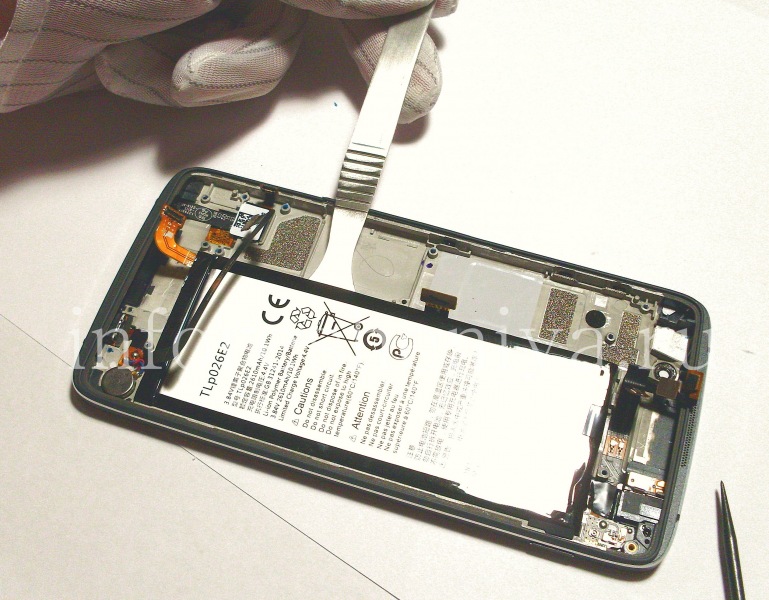
To remove the battery, pull the black bars from the top (2 pieces) and the bottom (1 pc), as pictured. Following you pull the glue under the battery.
BlackBerry DTEK50 Disassembly and Teardown: Hook the DTEK50 battery and gently separate it from the middle part.
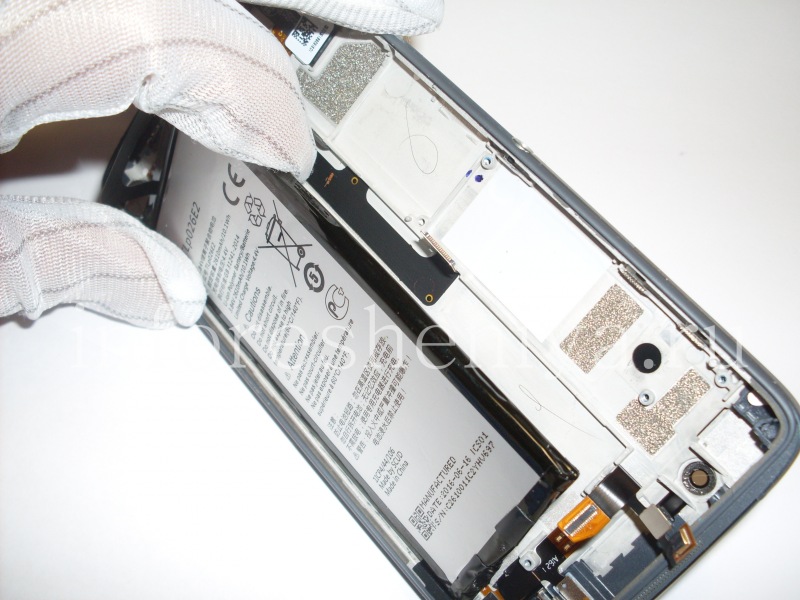
Hook the DTEK50 battery and gently separate it from the middle part.
BlackBerry DTEK50 Disassembly and Teardown: Take off the battery.
Take off the battery.
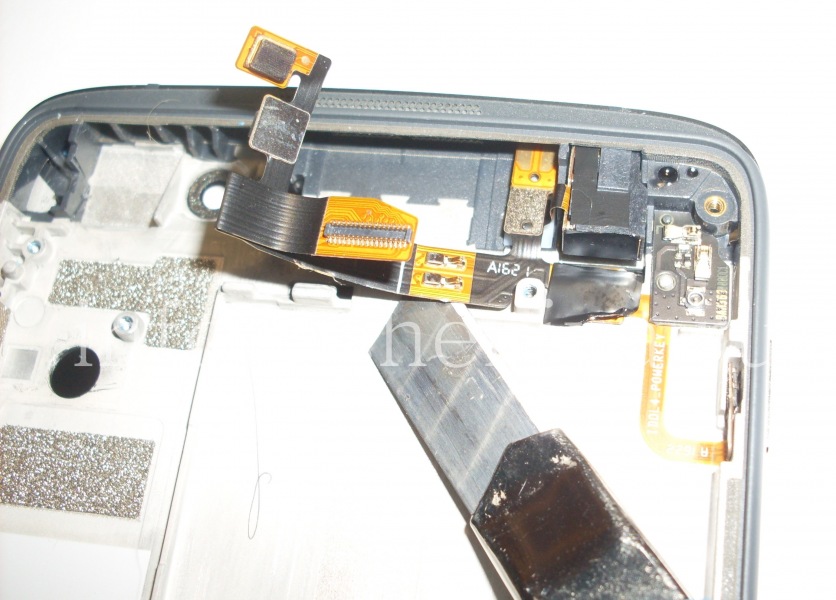
BlackBerry DTEK50 Disassembly and Teardown: Continue to the top of the smartphone, spare part called "Audio connector PCB assembly with LED-indicator, proximity sensor and ambient light, flash, microphone and a power button". Carefully separate the trail by blade from the middle part.
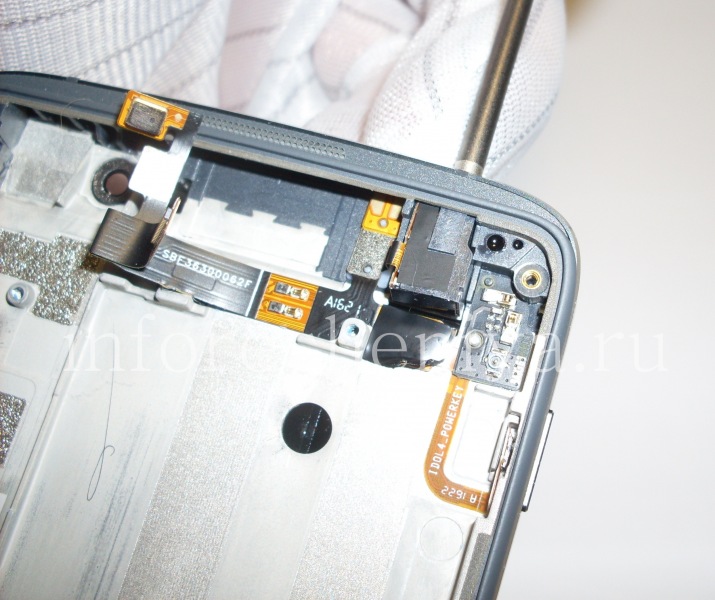
Continue to the top of the smartphone, spare part called "Audio connector PCB assembly with LED-indicator, proximity sensor and ambient light, flash, microphone and a power button". Carefully separate the trail by blade from the middle part.
BlackBerry DTEK50 Disassembly and Teardown: Then, insert a screwdriver into the audio jack and lift it up slightly.
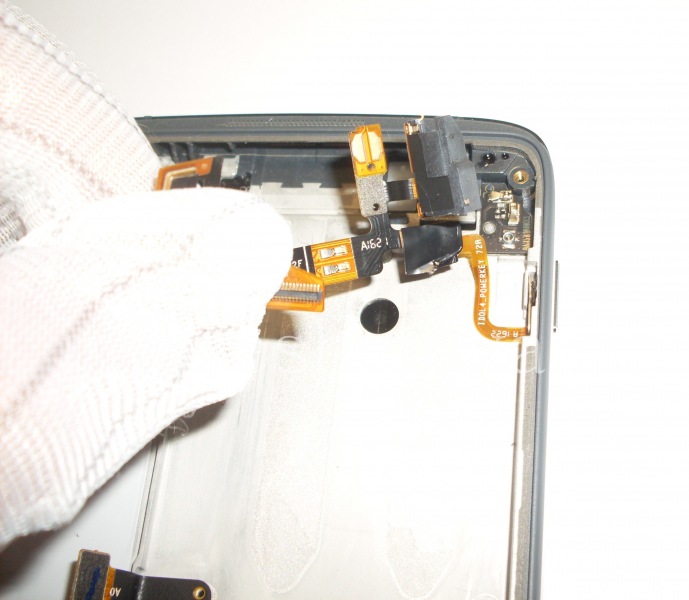
Then, insert a screwdriver into the audio jack and lift it up slightly.
BlackBerry DTEK50 Disassembly and Teardown: Slowly remove the spare from the smartphone body.
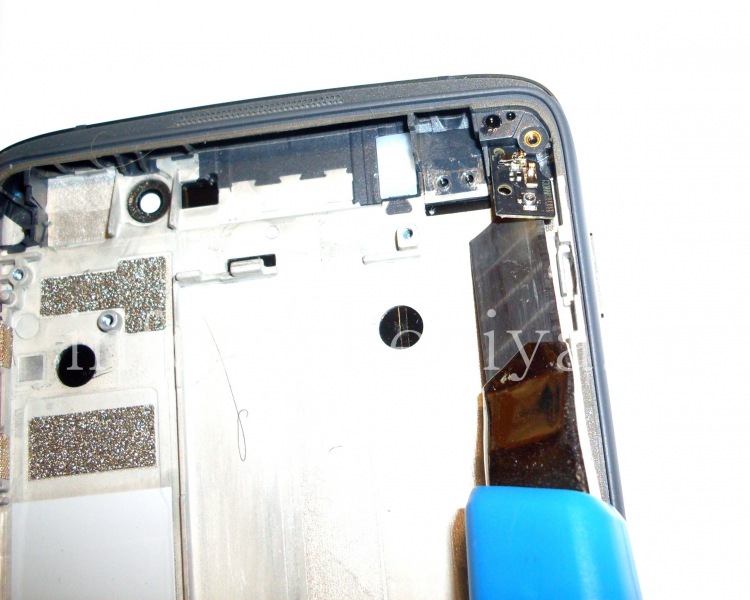
Slowly remove the spare from the smartphone body.
BlackBerry DTEK50 Disassembly and Teardown: The next step, using the knife loosen antennas PCB.
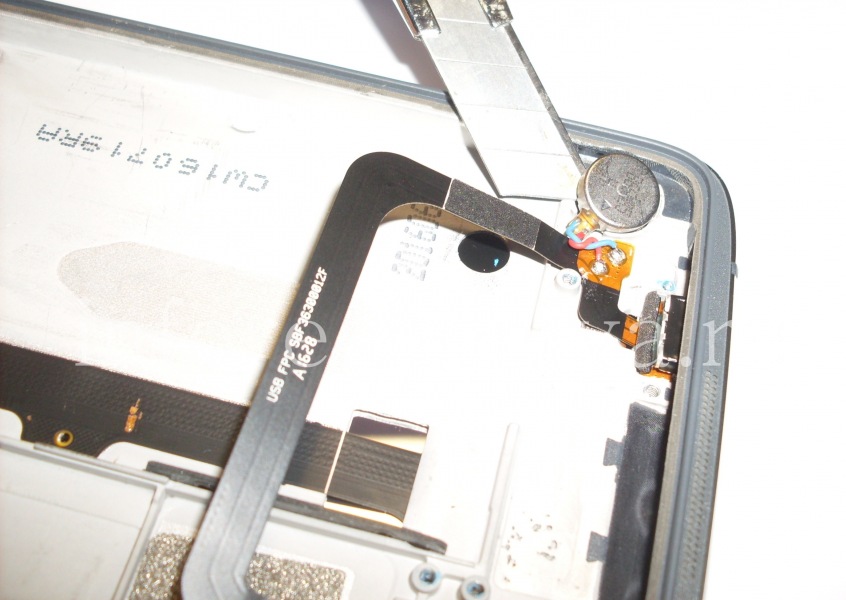
The next step, using the knife loosen antennas PCB.
BlackBerry DTEK50 Disassembly and Teardown: At the bottom of the device settles the DTEK50 USB-connector on its trail with the battery DC power. To remove it, first separate the battery.
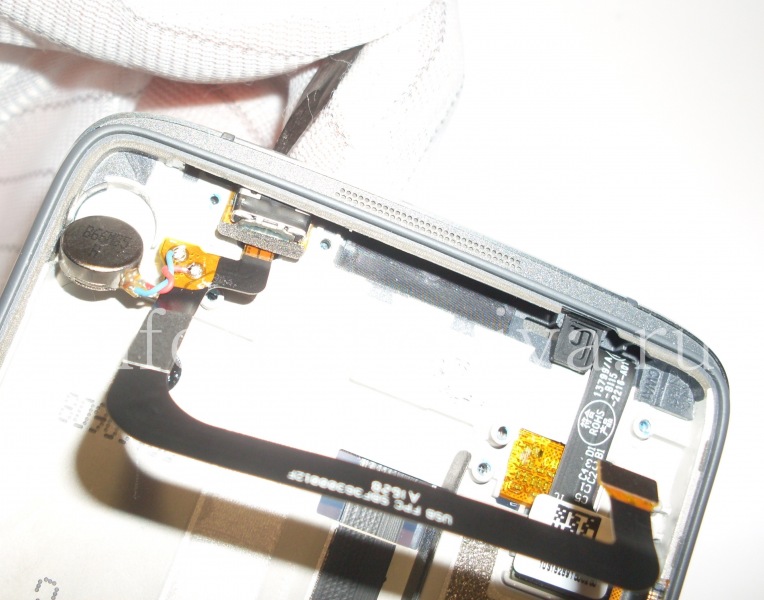
At the bottom of the device settles the DTEK50 USB-connector on its trail with the battery DC power. To remove it, first separate the battery.
BlackBerry DTEK50 Disassembly and Teardown: Then gently "pull out" the USB-connector in the direction of the inside of the smartphone.
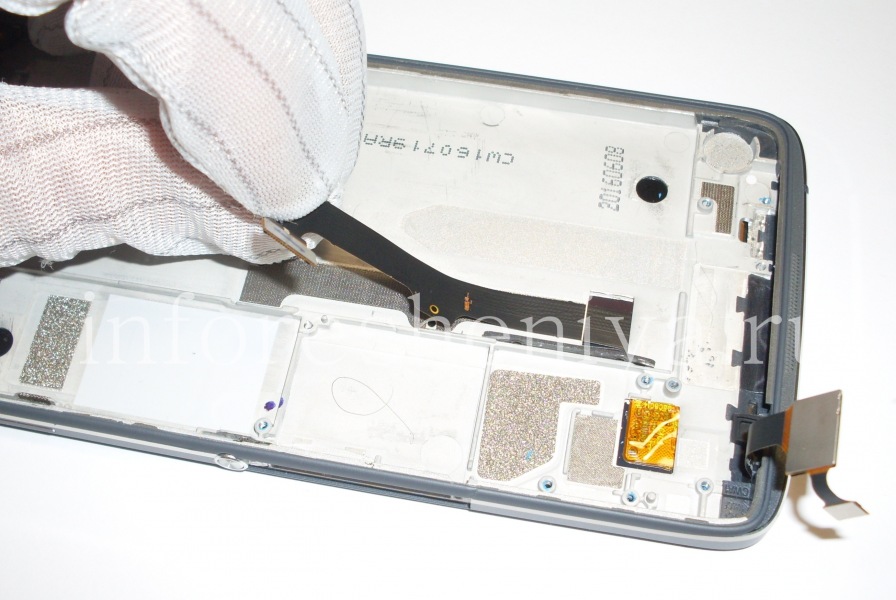
Then gently "pull out" the USB-connector in the direction of the inside of the smartphone.
BlackBerry DTEK50 Disassembly and Teardown: Well, now the most difficult part — the removal of BlackBerry DTEK50 screen. In fact, we recommend that you replace the whole part, LCD screen assembly with the bezel, that is at this stage of disassembly (spare part called LCD screen assembly with touch-screen and bezel for BlackBerry DTEK50). If for some reason you need to replace the screen only, continue to disassemble —  pull up the screen loop.
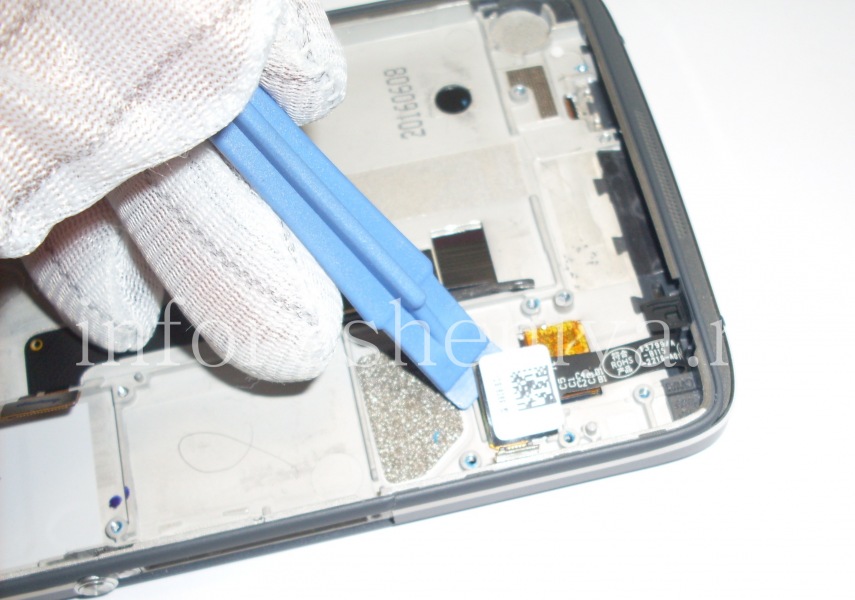
Well, now the most difficult part — the removal of BlackBerry DTEK50 screen. In fact, we recommend that you replace the whole part, LCD screen assembly with the bezel, that is at this stage of disassembly (spare part called LCD screen assembly with touch-screen and bezel for BlackBerry DTEK50). If for some reason you need to replace the screen only, continue to disassemble — pull up the screen loop.
BlackBerry DTEK50 Disassembly and Teardown: And touch-screen loop.
And touch-screen loop.
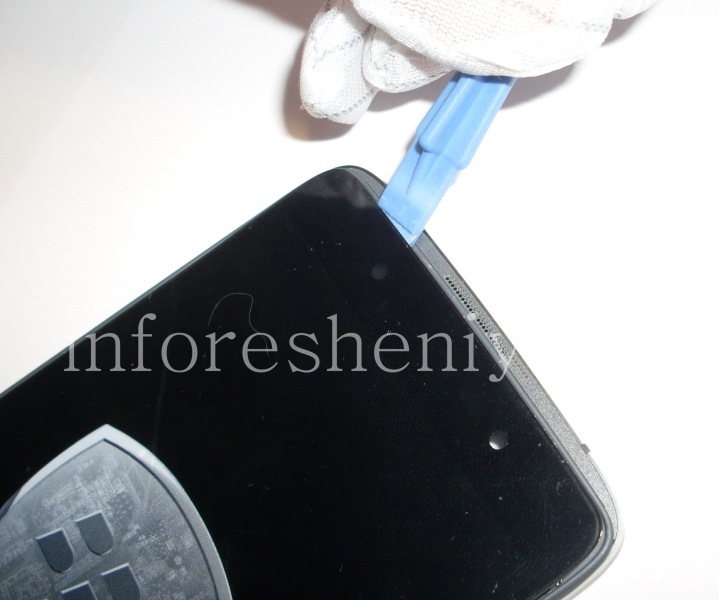
BlackBerry DTEK50 Disassembly and Teardown: Heat the LCD by dryer (yes, do not overdo it) and using plastic pty tool first unfasten the upper part of the screen, and then, moving around, the entire screen, from the DTEK50 bezel.
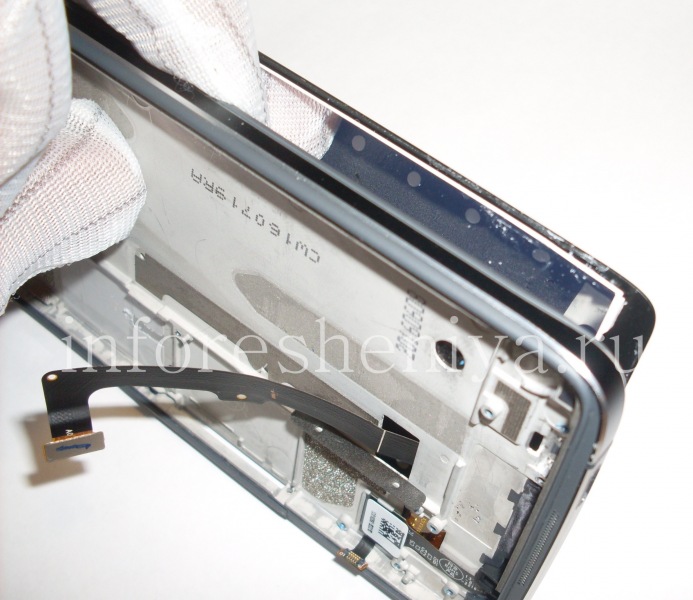
Heat the LCD by dryer (yes, do not overdo it) and using plastic pty tool first unfasten the upper part of the screen, and then, moving around, the entire screen, from the DTEK50 bezel.
BlackBerry DTEK50 Disassembly and Teardown: Slowly start to separate the screen from the middle part of the body.
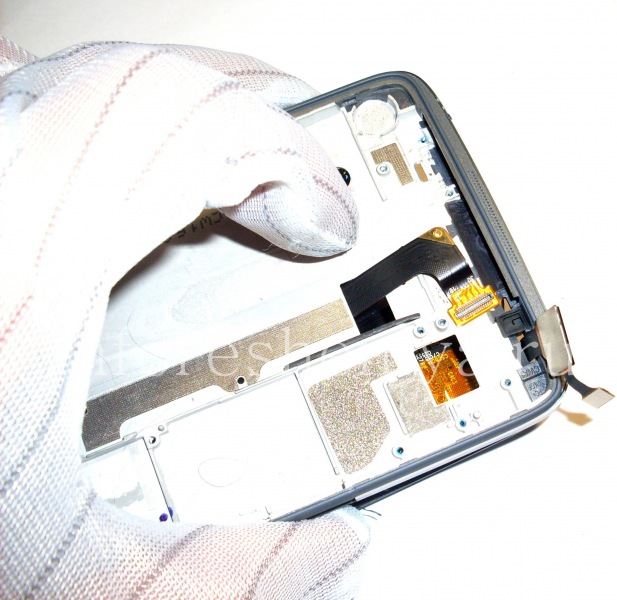
Slowly start to separate the screen from the middle part of the body.
BlackBerry DTEK50 Disassembly and Teardown: Pay attention to the screen and the touchscreen cables. They are also quite easy to damage.
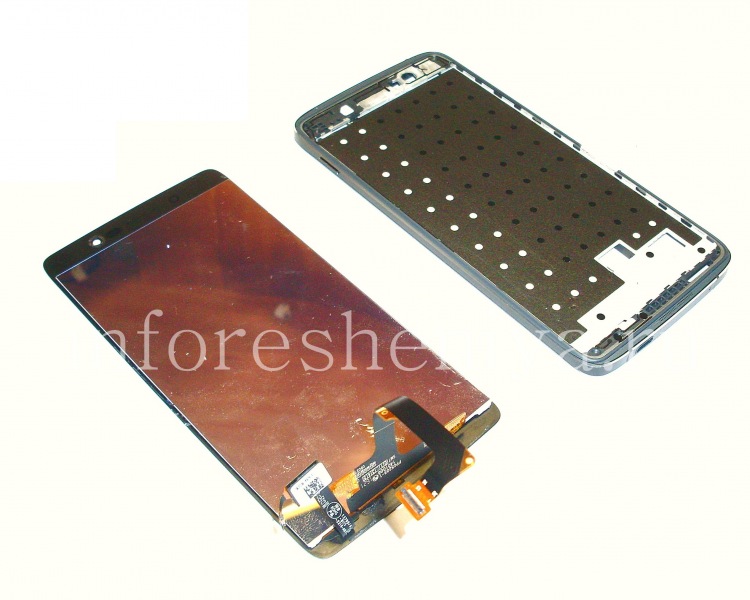
Pay attention to the screen and the touchscreen cables. They are also quite easy to damage.
BlackBerry DTEK50 Disassembly and Teardown: Here is the final part of the disassembly — Display + touchscreen and bezel (middle part) of the BlackBerry DTEK50.
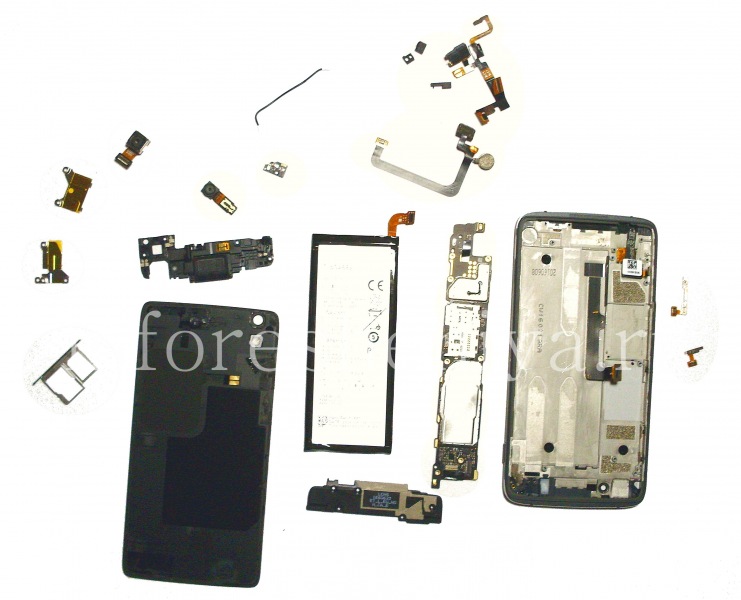
Here is the final part of the disassembly — Display + touchscreen and bezel (middle part) of the BlackBerry DTEK50.
BlackBerry DTEK50 Disassembly and Teardown: Here's what happened. Take apart of the BlackBerry DTEK50 is complete! I hope you got the proper fun ;)
Here's what happened. Take apart of the BlackBerry DTEK50 is complete! I hope you got the proper fun ;)